- Home
- About Saros
- Installation & Set-Up
- Support
- Develop on Saros
- Check-Out and First Steps
- Ongoing Work
- Guidelines
- Tools
- Processes
- Mailinglists
- Bug Tracker
- Saros@Sourceforge
- Google Summer of Code
- FAQ in daily practice
- Update local code to master
- Revert local changes
- Upload a new patch set
- Building in Gerrit failed!
- Get & run someones change
- Change? Patch set? Submit?
- Check Gerrit permissions
- Delete local branch
- Duplicate Location Error
- Review a change
- Run STF tests locally
- STF tests fail
- Set up STF tests
- Write STF tests
- Git use-cases
- Technical Documentation
- Research
- Contact
Develop on Saros with IntelliJ IDEA
On this page, you'll learn more about how to build and run the Saros IntelliJ IDEA plugin. Head back to the overview page, if you want to know more about the process of developing Saros-I and how to get involved in it.
Set up your development environment
Quick overview:
- Get the Saros sources: either via Eclipse, or by cloning from GitHub (
git clone https://github.com/saros-project/saros.git) or Gerrit (be careful to choose the SSH option, otherwise you can not push)- CURRENT NOTE: The state on the master is somewhat outdated as we are currently developing on the branch "release/intellij-0.1.0" and have not merged anything back. You should use this branch as it is far more stable than the current master for Saros/I.
- Get a current version of IntelliJ IDEA (we have only tested Saros/I for IntelliJ releases 2017.X and later)
- Open the project
de.fu_berlin.inf.dpp.intellij - Create and modify an IntelliJ Platform Plugin SDK named "IDEA SDK"
- Provide the SWT binary and sources
- Create a Run Configuration for starting IntelliJ IDEA with the Saros plugin
Step-by-Step: Starting IntelliJ IDEA and Opening the Project
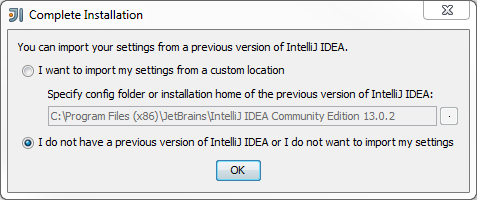
- If this is your first start of IntelliJ IDEA, you can safely select that you don't want to import anything.
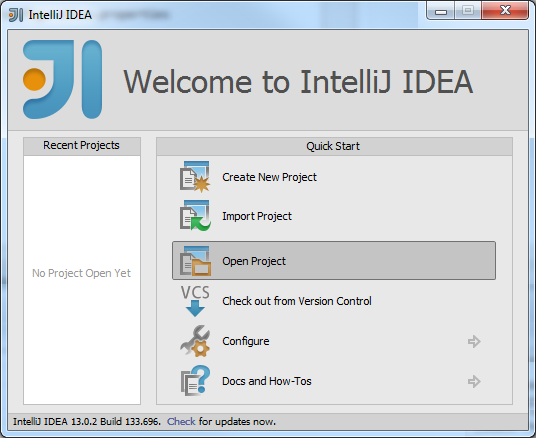
- Assuming that you already retrieved the sources, you can now open the IntelliJ Saros plugin project:
- Navigate to your local Git clone and select the project
de.fu_berlin.inf.dpp.intellij. Then click "OK".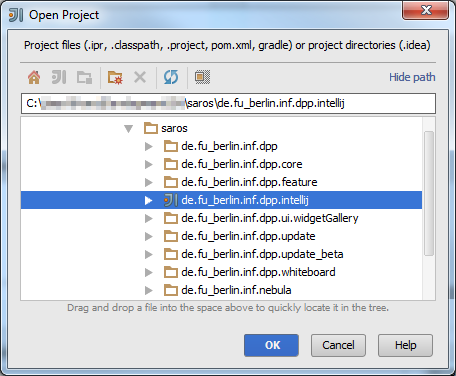
- IntelliJ IDEA will load the plugin module along with several auxiliary modules (the core module, the SWT plugin, and the two-part ui module) and display them in the project view on the left (or Alt+1).
- That's all. But in order to compile your source code, you need to set up and modify a Platform Plugin SDK (next section).
Step-by-Step: Create the proper Platform Plugin SDK
Why do you have to do this?
For building an IntelliJ IDEA plugin, you need certain libraries. Creating a new SDK only means: Create a new symbolic name, that points to an existing SDK. In this case, we're going to use the libraries that IntelliJ IDEA provides for building plugins: the "IntelliJ Platform Plugin SDK". The process is as follows:
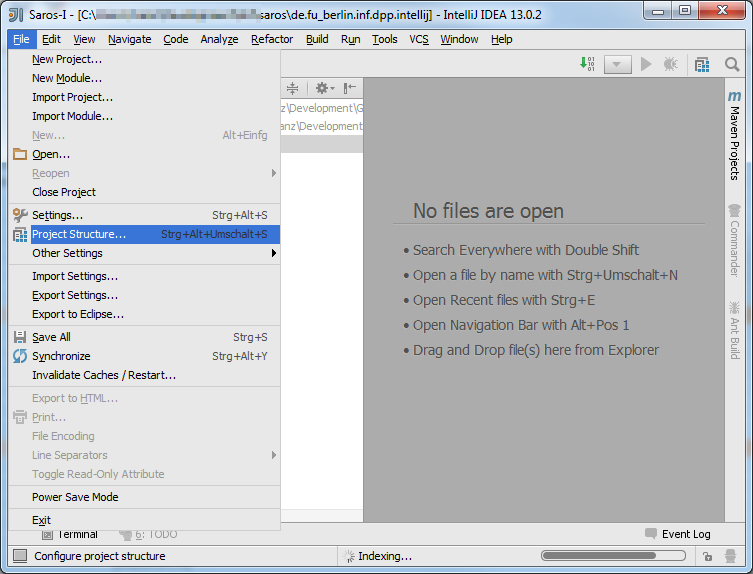
- Go to "File" > "Project Structure"
- You'll see that IntelliJ IDEA could not find the Project SDK named "IDEA SDK". Therefore we will create one. Click on "New..." and select "IntelliJ Platform Plugin SDK".
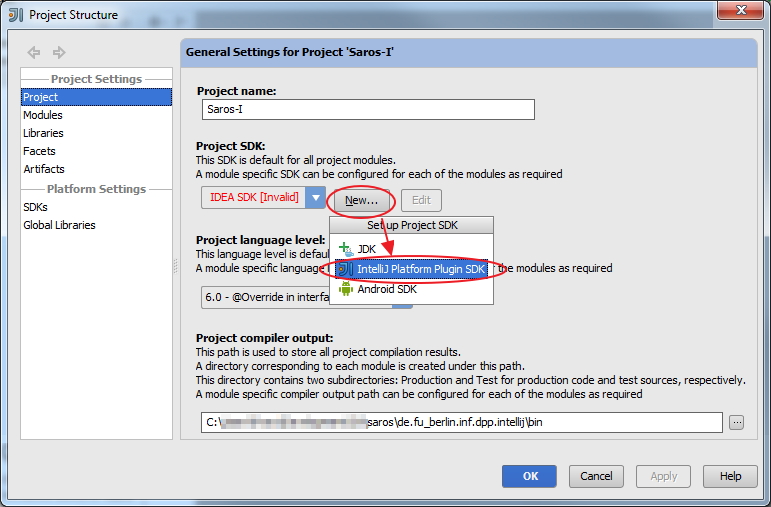
- In case IntelliJ IDEA prompts "Cannot Create SDK", just click "OK" and select a Java 8 JDK from your computer. Otherwise, just go to the next step.
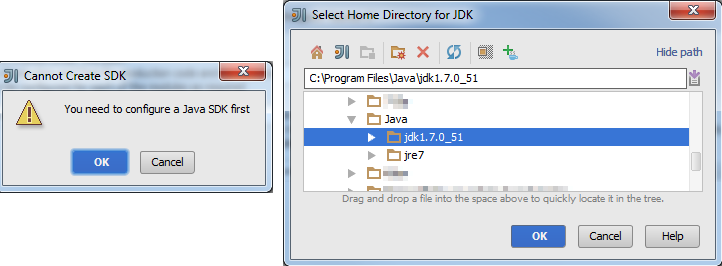
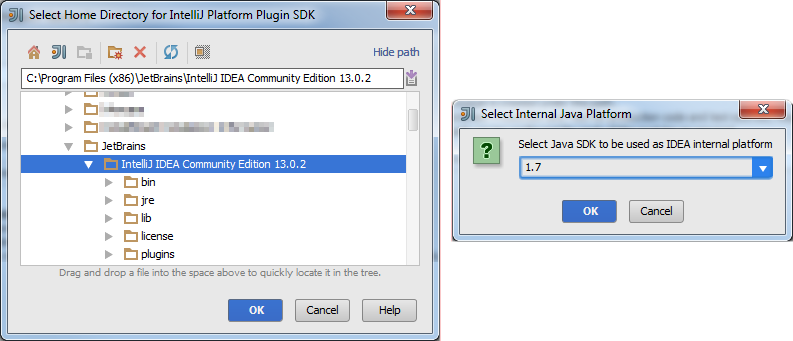
- Select the home directory of the new SDK (there is nothing wrong with the default selection). Then select the JDK you want to use internally (again, the default selection should be fine). The current IntelliJ version (2018.1), and therefore Saros/I, needs Java 1.8 to run.
- Now you have an SDK that provides the necessary libraries, but we still have to modify the name and some library settings. To modify your SDK click on "Edit".
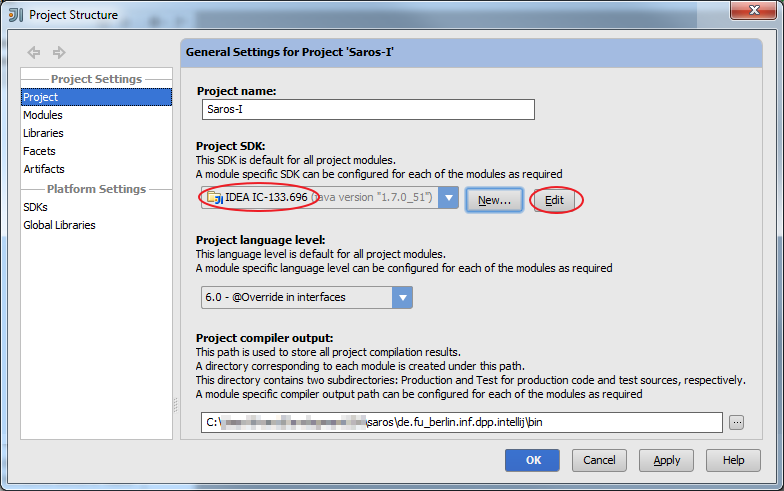
- Since IDEA SDKs are referenced by their name (through the file
.idea/misc.xml) and the default name is generated using the build number of your local IntelliJ IDEA installation, using the default name would result in edit wars when other developers use different IDEA versions. Therefore, we use a common name for the IntelliJ Platform Plugin SDK regardles of the IntelliJ version.
Type "IDEA SDK" into the field "Name" and then apply your changes.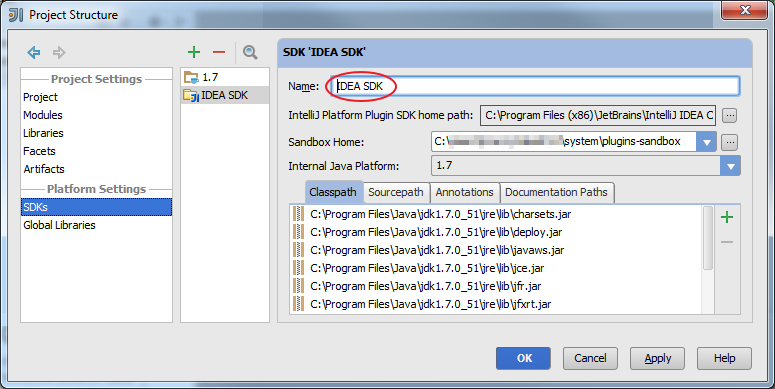
-
Optionally you may wish to add the IDEA sources to the SDK. This allows you to access the source code and code comments of IntelliJ classes, which can be very helpful. You can get the sources via http://www.jetbrains.org/pages/viewpage.action?pageId=983225. This will get you the most current version of the sources.
To get the source for the current release you are using, you can look up the used build by going to "Help" > "About". This will show the used IntelliJ version and the matching build below it. You can then checkout the matching tag "tags/idea/[BUILD-NUMBER]". For IntelliJ 2018.1 this would be "tags/idea/181.4455.78".
Then add the IDEA source folder to the IDEA SDK, by pressing the big green "+" in the tab "Sourcepath"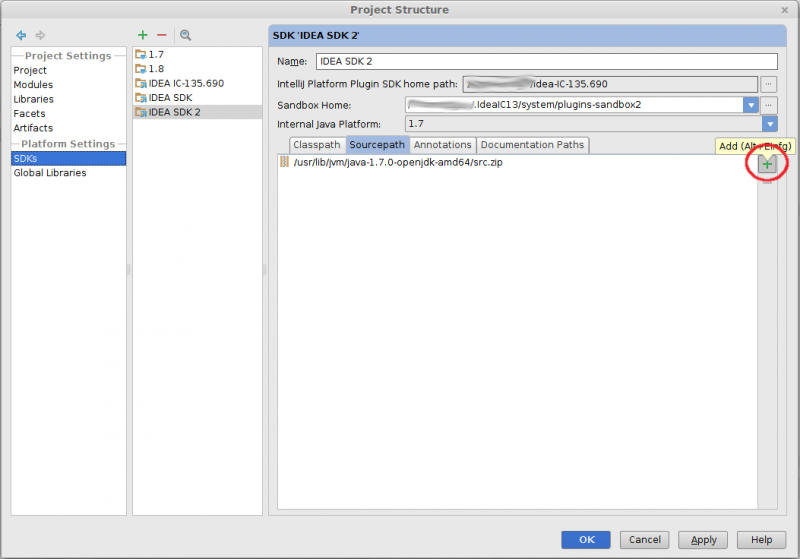
-
Apply your changes and close the dialog.
Step-by-Step: Provide SWT binary and sources
Download the SWT sources that match your environment to compile Saros/I
-
For now, Saros depends on SWT, no matter whether you want to develop SWT UI or not. Download "SWT binary and sources" that matches your platform from here.
-
Unzip the file and copy "swt-debug.jar" and "src.zip" into
de.fu_berlin.inf.dpp.ui/lib. -
Rename "src.zip" to "swt-src.zip".
-
Now the project should compile.
Deploy the SWT-Plugin that comes with Saros to your IntelliJ plugin directory
-
In order to get Saros/I running you need to install the "swt library plugin". You can find it in the folder
de.fu_berlin.inf.dpp.swt_plugin.
To install the plugin please copy the whole folderde.fu_berlin.inf.dpp.swt_plugininto your IntelliJ plugin directory. For more information about where this directory is, see https://www.jetbrains.com/idea/help/project-and-ide-settings.html.
Tip: Look in the following dialog to find the "plugins" directory which resides just next to Sandbox Home: -
Now you are in the position to compile your own IntelliJ Saros plugin. To make this as easy as possible, we're going to create a Run Configuration in the next section.
Step-by-Step: Create a Run Configuration
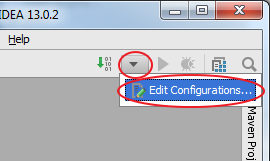
- Find the little downward arrow in the top right corner, click on it, and select "Edit Configurations..."
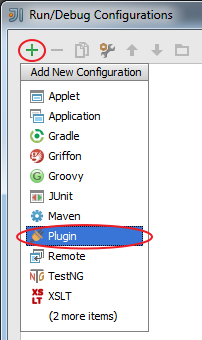
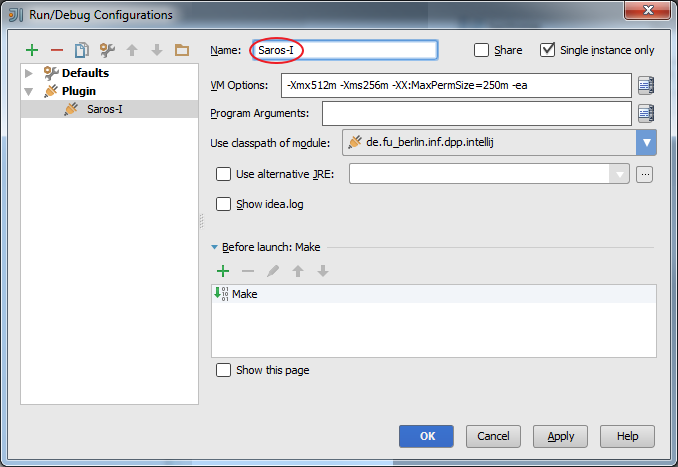
- In the newly opened wizard, click on the plus sign (top left) and select "Plugin" (because we want our new Run Configuration to launch Saros, which is a plugin).
- IntelliJ IDEA will find the Saros intellij plugin and fill in the fields "Use classpath of module" and the "VM Options" for you. It will also add a "Make" before launching so your source code will automatically be built. The only thing left for you to do is choose a name for this Run Configuration, e.g. "Saros-I". Then you can apply your changes and close the wizard.
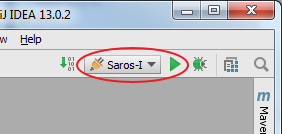
- Now you will find your new Run Configuration in the top right corner. You can launch it by clicking on the play button. IntelliJ IDEA will then compile your source code, create an IntelliJ IDEA plugin, and start a new instance of IntelliJ with this plugin installed, so you can play around with it and test its features.
Deploy and install the Saros-I plugin
Saros/I can be packaged as a .zip file which can be installed in another IntelliJ instance via "Settings" > "Plugins" > "Install plugin from disk...". There are two ways of creating the packaged version:
From within IntelliJ IDEA:
- Go to the folder "de.fu_berlin.inf.dpp.ui.frontend/bin/" and remove the "META-INF" folder. (This folder will be recreated every time you choose the option "Build">"Rebuild project" and needs to be removed every time before the plugin zip can be build.)
- Inside the project, from the menu, choose "Build" > "Prepare Plugin Module 'de.fu_berlin.inf.dpp.intellij' for Deployment".
Using the command line:
NOTE: The current build.xml is set up to work in out server environment and is not set up in our default IntelliJ environment. We suggest using the build method provided above until the build file was adjusted and correctly integrated in a IntelliJ development environment.
-
Inside a terminal, open the IntelliJ project folder "de.fu_berlin.inf.dpp.intellij" and run
ant plugin.bundle.zip.saros-i
Working with Gerrit
NOTE: This is an old section based on the state of IntelliJ IDEA 13.1.7. The gerrit plugin (if it still exists) might support our use case by now.
As far as we know, the IntelliJ Gerrit plugin does not work with out setup, since we use SSH keys. You can either work with Gerrit via
- Eclipse, like for Saros for Eclipse
- Using plain git (Gerrit is just a large and specially organized git repository, so all interaction can be done with standard git clients)
- See the Gerrit documentation for details https://gerrit-review.googlesource.com/Documentation/#_tutorial
Working on Saros for IntelliJ with Eclipse (Refactorings)
When refactoring Saros core code it is often useful to be able to refactor code in the IntelliJ and the Eclipse packages at the same time. The easiest way to so is to import the IntelliJ project in Eclipse and configure the appropriate libraries.
(If you find a way to build Saros for Eclipse in IntelliJ, please write us!)
The guide will assume, that you have Saros for Eclipse and for IntelliJ set up and running.
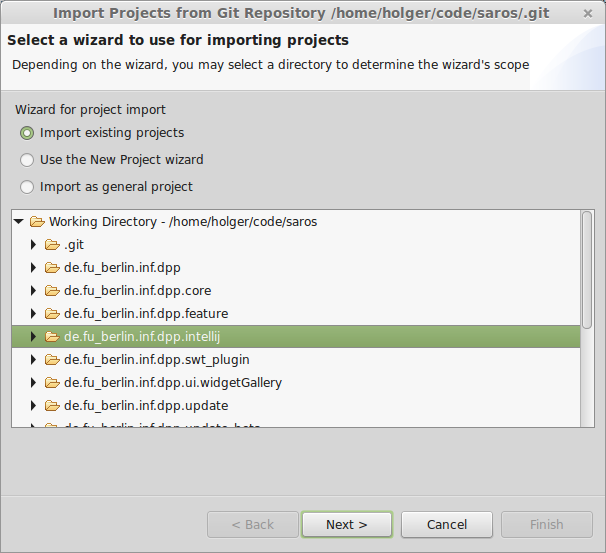
- In the "Git repositories" view, unfold "Working directory", right-click on "de.fu_berlin.inf.dpp.intellij" and select "Import projects...".

- From the bullet list, choose "Import existing Projects" and click "Finish" on the next page without changing anything.
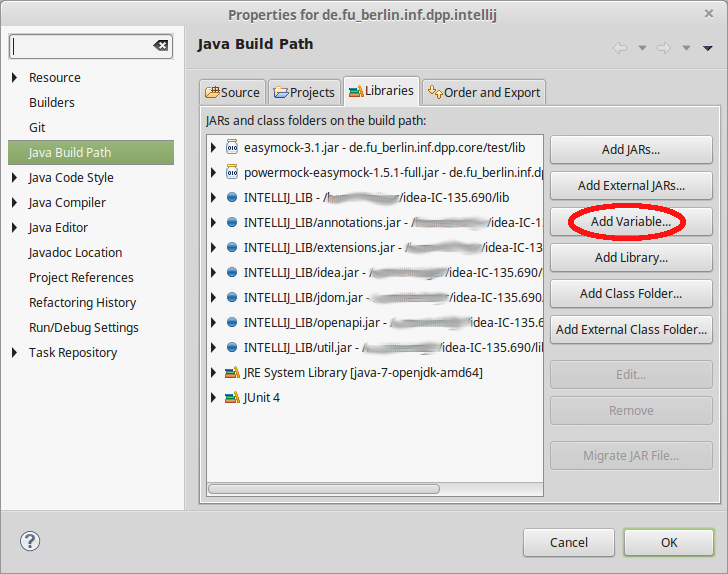
- We need to add the IntelliJ libraries to the build path in order to compile the project. To do so open "Configure Build Path...", go to the "Libraries" tab, click on "Add Variable...".
- In the "New Variable Classpath Entry" dialog, select "Configure Variables..."
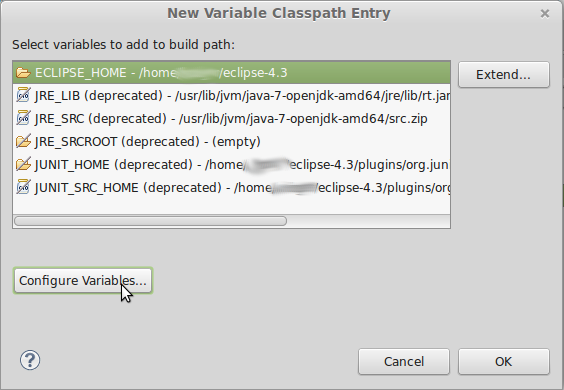
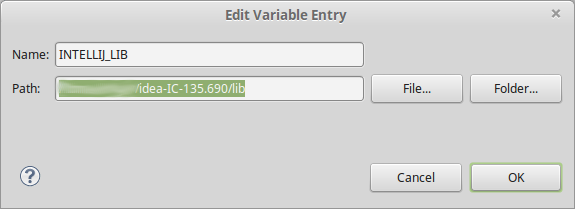
- In the opening Preferences pages, click on "New..." and create a new Classpath Variable called "INTELLIJ_LIB" (exact name) and add as Folder the "/lib" folder of your local IntelliJ installation (found in the IDEA folder).
Now your Eclipse is able to compile Saros for IntelliJ!
Known issues
Ubuntu 14.04 LTS (64bit) and Linux Mint 17.1 (64bit)
When following the step-by-step setup instructions on this site, the following error message will be thrown when compiling the Saros-I project:
(java:30635): GLib-GObject-WARNING **: cannot register existing type 'GdkDisplayManager'
(java:30635): GLib-CRITICAL **: g_once_init_leave: assertion 'result != 0' failed
(java:30635): GLib-GObject-CRITICAL **: g_object_new: assertion 'G_TYPE_IS_OBJECT (object_type)' failed
To resolve the issue the following steps are necessary:
- Install libwebkitgtk-1.0.0, for example via using the APT packet manager:
sudo apt-get install libwebkitgtk-1.0.0 - Download SWT binary and sources version 4.3.2 (http://download.eclipse.org/eclipse/downloads/drops4/R-4.3.2-201402211700/#SWT)
- Unzip the file and rename "swt.jar" to "swt-4.4-gtk-linux-x86_64.jar". Replace the equally named file in
path/To/Your/Sandbox/Plugin/Folder/de.fu_berlin.inf.dpp.swt_plugin/resources/