- Home
- About Saros
- Installation & Set-Up
- Support
- Develop on Saros
- Check-Out and First Steps
- Ongoing Work
- Guidelines
- Tools
- Processes
- Mailinglists
- Bug Tracker
- Saros@Sourceforge
- Google Summer of Code
- FAQ in daily practice
- Update local code to master
- Revert local changes
- Upload a new patch set
- Building in Gerrit failed!
- Get & run someones change
- Change? Patch set? Submit?
- Check Gerrit permissions
- Delete local branch
- Duplicate Location Error
- Review a change
- Run STF tests locally
- STF tests fail
- Set up STF tests
- Write STF tests
- Git use-cases
- Technical Documentation
- Research
- Contact
Getting Started with Saros
You can now create new accounts for our XMPP server saros-con.imp.fu-berlin.de (and change your password or delete existing accounts) through the website https://saros-con.imp.fu-berlin.de:5280/register/. You can still manage your account and friends-list through the Saros interface.
— Saros Project (@saros_project) 25. Juni 2018
Here you will find a guideline on how to set up Saros.
After that you might want to find out what Saros can do: Here is the complete feature list.
- First steps
- Exploring Saros
The Host
Before we get started you should know that Saros is a host-based system.
To get familiar with this concept check out our comic:


First steps
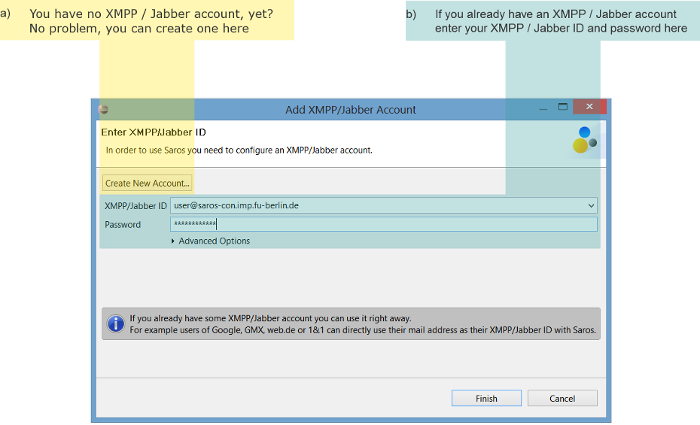
Step 1: Connecting
You need an XMPP account to use Saros.
- You can create a new account within Saros by using the FU-Berlin servers.
- You can use an existing account.
For example your Google, GMX, or web.de mail address. They are valid XMPP accounts.
To use your Google account you have to allow less secure apps access your account, see
https://support.google.com/accounts/answer/6010255?hl=en
Unfortunately, gmx and web.de accounts do not work currently.
To do that simply start the Saros Configuration wizard (Menu > Saros > Start Saros Configuration)
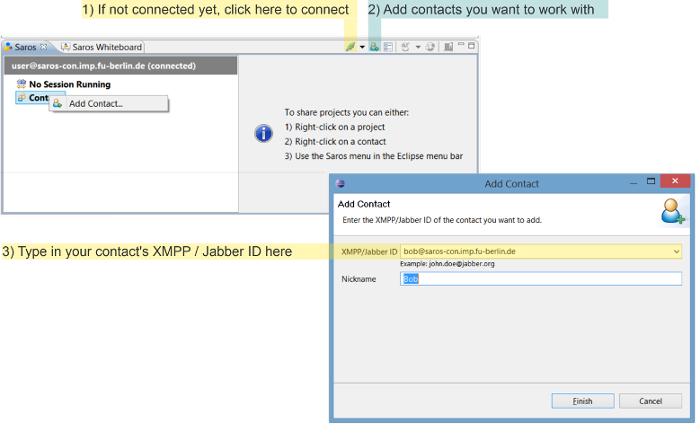
Step 2: Adding contacts
To add a contact to your list you need to know his/her XMPP ID.
After entering your partner's XMPP ID, a message will be sent to your contact.
Once s/he accepts your request you will be able to see his/her online status in your contact list.
Step 3: Starting and joining sessions
You can work together with your contacts by either starting your own session or by being invited to one.
When starting a session, Saros will copy the project to the computer of your invited contacts.
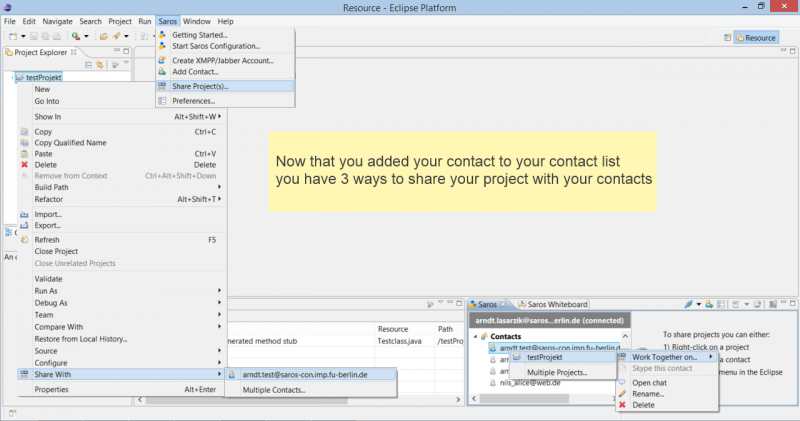
a) Start a session (host)
- Right-click on...
- a project in your Package Explorer and select Share With
or - a contact in the Saros View and select Work Together on
- a project in your Package Explorer and select Share With
- Wait for your contacts to accept the session invitation
Want to know more about the Saros host role? Check out our comic here.
b) Join a session (client)
- Wait for a session invitation to appear on your screen
- Click Accept to accept the invitation
- Tell Saros where to save the incoming project:
- You can create a new project, or
- synchronize with an already existing project on your computer.
- Select Finish and wait for the project to be copied to your computer
Additional information:
- If you accept an invitation and decide to synchronie the incoming project with your own copy, Saros will automatically add, change, or delete all files as necessary.
- Saros will share all files which are not marked as derived by Eclipse, because it should be possible to recreate such files (
.classfiles for instance) at the client's side. If you use a build tool such as Ant, it might be necessary to manually set the resulting files or folders to derived on both the host's side (so they won't be copied to the client) and the client's side (otherwise the files will be deleted on synchronization).
Exploring Saros
Step 4: Exploring the Saros View
The Saros View consists of three parts
- the contact list
- the session list
- the chat area
The contact list is where all your contacts are, allowing you to check their availability, send them instant messages, and invite them to Saros sessions.
When you are in a Saros session you will see all participants in the session list. Saros also provides instant chat messaging to accompany your sessions.
Whenever you begin a Saros session, a chat session is also automatically started.
Step 5: Exploring the Saros Toolbar
General
 Connecting:
Click here to connect or disconnect from the server, or to switch between user accounts if you have more than one. When you connect, you will see information about your contacts (including whether they are connected and also whether they support Saros).
 Add Contact:
To add a new contact click here (you will need the full XMPP address of your contact in the format: username@server).
 Open Saros preferences:
Opens the Saros section of the Eclipse preferences. This is a shortcut for Window > Preferences > Saros.
 Inconsistency repair:
Sometimes accidents can happen and your copy of the project can become out of sync with the host's copy. When it does, this button will light up. When you click it, the inconsistencies will be repaired.
 Switch Follow Mode on/off:
You can turn the Follow Mode on and of. In Follow Mode Saros will automatically sync your Eclipse view with the user you are following, opening shared files the user is opening, and automatically scroll to the visible part of the editor of open files, so you always see what the followed user sees.
 Leave the session:
Click here to leave the current session. If you are the host, the session will be closed and all participants will be ejected from the session.
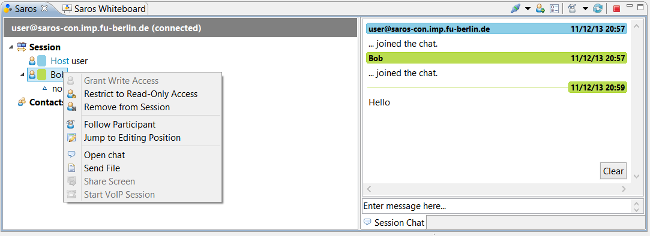
Context Menu
 Grant Write Access:
Gives the selected participant write access.
 Restrict to Read-Only Access:
Removes the write access right from the selected participant. The affected participant will only have read access afterwards.
Follow Participant:
Follows the selected participant as described in section Follow Mode.
 Jump to Position:
Jumps to the cursor position of the selected participant and open the corresponding file if necessary.
 Open chat:
Opens a chat with this contact on the right side.
 Send File:
Gives you the opportunity to select a file to be sent to the selected participant.
Good to know
User Roles
By default all participants of a session have writing access. To restrict or grant this access to other participants, right-click on that user in the session list and select Restrict to read-only access or Grant writing access. This can only be done by the host.
Follow Mode
You can use this feature to follow a single participant as s/he navigates the project and performs changes. When you follow a participant:
- Whenever s/he opens a file on his/her computer, it is opened on yours too.
- Any time s/he switches to view a different file, it is switched on yours.
- As s/he scrolls through a file, the viewpoint is moved on your computer also, so that you see what s/he sees.
Staying Aware of your Fellow Participants
There are multiple ways of staying aware of what a driver is currently doing:
- In the package explorer (or resource navigator):
 A colored dot decorates the file that a participant has currently in focus. The color resembles the color of the active user.
 A blue arrow decorates a file that is shared with other participants.
- Cursors:
The position of a participant's cursor appears in the file in his/her color. - Selections:
Any text selected by a participant also appears highlighted in the file. - Changes:
If a participant writes something, his/her text will appear highlighted in his/her color. - Locate participants:
On the right side of editors you can see colored bars representing the viewports of each user. These show which part of the file each user can see. - Follow participants:
Follow mode allows you to follow all movements of another user as s/he moves within and between files. In the Session list, right click on the user you wish to follow and select Follow Participant.